More and more photographers are seeking out photo editing software that doesn’t weigh them down by locking them into an expensive ecosystem of subscription model software. If you’re ready to ditch your costly editor and replace it with a platform that offers high-quality RAW processing and a full suite of local adjustment tools and smart features, ON1 Photo RAW is ready for you to explore.
We make it easy for Lightroom Classic users to migrate Lightroom catalogs to ON1 Photo RAW. With powerful editing capabilities, AI tools, nondestructive editing, and intuitive organization, Photo RAW offers all of the features that you get with Lightroom — without the recurring cost of a subscription.
This guide takes you through the process step by step. Learn how to prep your Lightroom catalog for migration and understand how to choose the best settings to set your new ON1 Photo RAW catalog up for success.
- Before You Begin: What to Expect
- What Gets Migrated From Lightroom to ON1 Photo RAW
- Step-by-Step Migration Guide for 2026
- Frequently Asked Questions
Before You Begin: What to Expect
We’ve made it as easy as possible to make the switch from Lightroom to ON1 Photo RAW. Before we get started, it’s important to understand what will get migrated and what migration limitations exist. The ON1 Photo RAW Lightroom Migration Assistant will bring over photos in their nondestructive state, with star ratings, color labels, keywords, and basic metadata. It will not transfer over your Lightroom developmental edits. Because the migrated photos are nondestructive, you can make all the same adjustments you would in Lightroom but in ON1 Photo RAW.
Photo RAW will never touch or alter your original Lightroom catalog or source photos, and all of your original photos will be safe during and after migration.
Be prepared for a lengthy migration process. We recommend starting this process at the end of the day so that the migration tool can work overnight
Why Doesn’t Photo RAW Bring Over All of My Exact Photo Edits?
To understand why we can’t bring over every developmental edit you’ve made in Lightroom, we need to explain how RAW processing works. Processing a RAW photo is a complex process. The compressed data must be decoded. Next comes de-bayering, which is what actually converts the RAW data into a full-color RGB image. At this point, the photo still won’t look like what you saw when you looked through your camera. That magic happens when the RAW processor adjusts whitepoint, applies a gamma curve, and other camera-specific adjustments like color, camera profiles, noise reduction, and hot pixel and lens distortion correction.
Every RAW processor handles these processes differently. That’s why moving your photos from Lightroom to ON1 Photo RAW is not as simple as merely copying them over. The way that Lightroom processes slider values will not be the same as the way we do it in ON1 Photo RAW, and that’s true of every photo editing software. To translate Lightroom settings to our settings, Photo RAW has developed a fast, machine-learning algorithm that analyzes each photo to determine which Photo RAW settings correspond to the Lightroom settings applied to each photo.
In other words, ON1 Photo RAW migrated settings will be very close to your Lightroom adjustments, but they can’t be 1:1 replicas. Still, our migration assistant will transfer over almost every edit, with a high degree of accuracy. And because your photos are transferred in a nondestructive state, your original photos are safe.
What Gets Migrated From Lightroom to ON1 Photo RAW
Below, we’ve created an easy-to-follow chart that explains what will get carried over during the Lightroom migration process, and what will not:
| Lightroom Feature | Migrated? | Notes |
|---|---|---|
| Folders | Yes | All top-level Folders in Lightroom become top-level cataloged folders in Photo RAW. |
| Photos/Videos | Yes | All photos/videos in the cataloged folders are added. This may include some photos that are not cataloged in Lightroom. Photo RAW only migrates available photos and does not migrate photos from offline volumes. Only files of supported file types and color modes will appear. |
| Versions | Yes | |
| Stacks | No | |
| Collections | Yes | All normal collections are migrated to albums. Collection sets become album sets. Smart collections are not migrated. |
| Crop | Yes | No |
| Spot Removal | Yes | Spot Removal is migrated to the Clone Stamp when used in Clone mode. When used in Heal mode, it is migrated to the Perfect Eraser. The results will not be a pixel-perfect match but will generally remove the same spots with comparable results. |
| Basics | Yes | Camera Profiles are matched for Adobe and Camera profiles. Other LUTs or custom profiles are not migrated. Clarity is called Structure in Photo RAW. Dehaze is called Haze and will look a bit different. The quality of the results is very good for most photos. |
| Black & White | Yes | You will find this in the Black & White filter in Effects. |
| Tone Curve | Yes | Parametric curve adjustments are not migrated, but point-based curves are. |
| HSL/Color | Yes | You will find this in the Color Adjustment filter in Effects. |
| Split Toning | Yes | You will find this in the Split Tone filter in Effects. Colors will be close but not exact. |
| Detail | Yes | There are significant differences in the sharpening and noise reduction algorithms. We did our best to align them, but they may require manual adjustments to taste before output. |
| Lens Correction | Yes | We will apply automatic lens correction if we have a matching lens profile. Manual distortion settings are not migrated. |
| Transform | No | Transform is very different and we couldn’t find a practical way to migrate these settings. You can achieve similar results using the Transform pane in Develop in Photo RAW. |
| Effects | Yes | You will find these in the Vignette and Film Grain filters in Effects. |
| Calibration | No | |
| Red Eye | No | You can reduce red-eye automatically in the Portrait module. |
| Graduated Filter | Yes | You will find these as adjustment layers in the Local module using the Adjustable Gradient. Range mask, Moire and Defringe are not migrated at this time. |
| Radial Filter | Yes | You will find these as adjustment layers in the Local module using the Adjustable Gradient. Range mask, Moire and Defringe are not migrated at this time. |
| Adjustment Brush | Yes | You will find these as adjustment layers in the Local module using the Adjustment Brush, including the Auto Mask function. Range mask, Sharpening, Moire and Defringe are not migrated at this time. |
The Step-by-Step Migration Guide for 2026
Follow these steps to migrate from Lightroom to ON1 Photo RAW. If you have more than one Lightroom catalog, you can use this process for each catalog to merge them into one ON1 Photo RAW installation.
Step 1: Prepare Your Photos for Migration to ON1 Photo RAW

Before we actually begin the migration process, there are a few simple steps to make sure everything runs smoothly.
Quick prep steps:
- Gather all of your photos: Connect all external storage with your photos to ensure that Lightroom has access to all of the files in your catalog.
- Make sure Lightroom is up to date: Use the Synchronize Folder… option under the Library dropdown menu in Lightroom to locate any missing files, as shown in the photo above. This will also validate DNG files and clean up any broken links between your images and your Lightroom catalog.
- Clean up your catalog: Remove any unwanted photos and collections, and reorganize your folders as needed.
- Clear space: This step is very important. Make sure you have enough free space on your hard drives before you start migrating, especially if you plan to use the copy option to make rendered duplicates.
A note on Lightroom collections: Any normal collections, i.e., the ones you drag and drop photos into, and their contents will be copied over to ON1 Photo RAW as Albums. If you have used collection sets, their organization will be maintained as well. Smart Collections will not be migrated. However, you can create Smart Albums later inside Photo RAW, which are similar.
Step 2: Open the Lightroom to ON1 Photo RAW Migration Tool
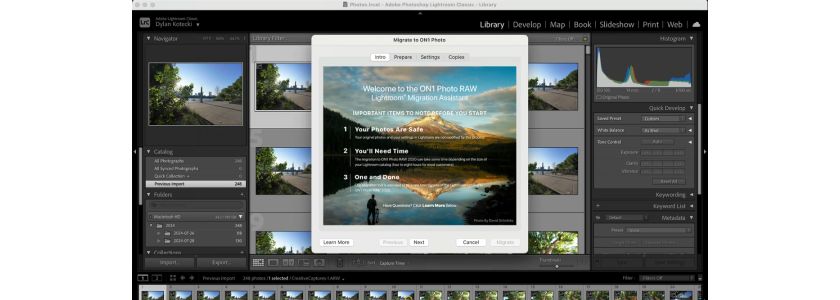
Once you’ve prepped your Lightroom catalog for migration, let’s dive in. Pulling up the Lightroom Migration Tool in ON1 Photo RAW is easy. Simply select File > Plug-In Extras and select Migrate Catalog to ON1 Photo RAW:
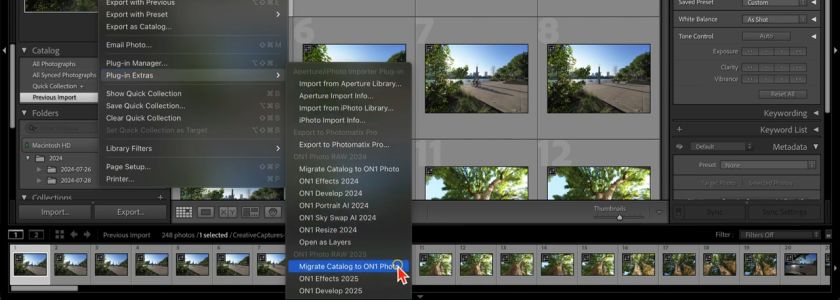
This will pull up the ON1 Photo RAW Lightroom Migration Assistant. Click Next to continue.
Step 3: Understanding the Migration Options
Within the Lightroom Migration tool, you’ll have a few options to consider.
First, choose whether or not you want to migrate collections and develop adjustments. For any photos that you’ve edited in Lightroom, Photo RAW will migrate those settings nondestructively. That means you can always go back and adjust or reset your photos as needed. This process will include the RAW processing options as well as crop, retouching, and local adjustments.
Most users select both options in this step.
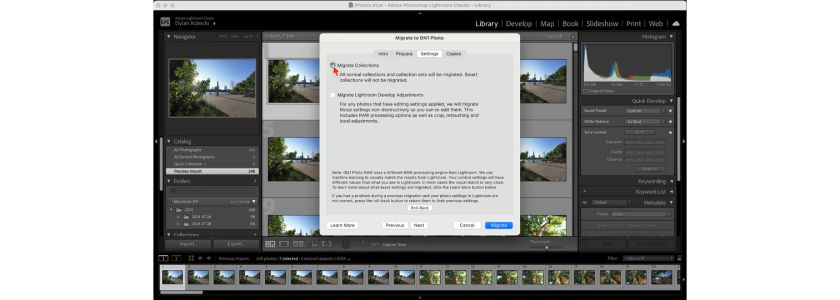
Secondly, you’ll need to decide if you want to create rendered copies of your edited photos during migration. Rendering means that any photos you edited in Lightroom will be copied over with those adjustments, and you will not be able to re-edit or reset them. Don’t worry, if you choose this option, the rendered photos are simply duplicates. You’ll still have access to your original photos. This option is useful if you want to render out photos with your Lightroom settings.
Note: If you choose to copy your Lightroom adjustments, the migration process will take longer, but you can continue to use both Lightroom and ON1 Photo RAW while your photos migrate.
Once you’ve finalized your migration settings, it’s time to select your Lightroom catalog. Select the Migrate button to move forward.
Step 4: Starting the Migration and What to Expect
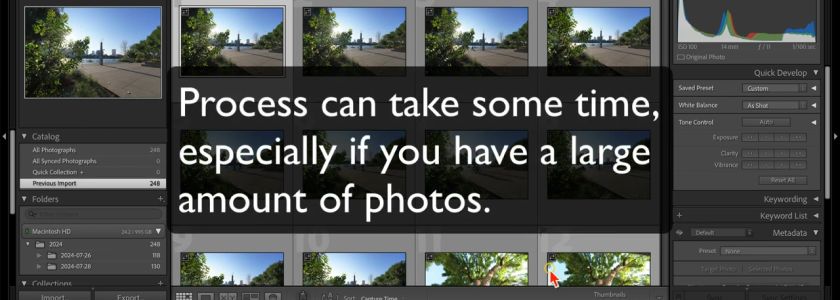
Here’s where the magic happens. The migration process itself isn’t very exciting, but don’t worry: you can continue to use both Lightroom and ON1 Photo RAW during the migration process. If you have a large number of photos, need to migrate multiple catalogs, or want to carry over rendered copies, the migration process can take quite some time.
Once the process is complete, your folders and collections will appear in ON1 Photo RAW just like they do in Lightroom. Photos with Lightroom adjustments will appear with an LR badge on them inside your ON1 Photo RAW catalog.
Now you’re ready to explore all that ON1 Photo RAW has to offer!
How to Switch From Lightroom Classic (Video Walkthrough)
Migrating your photos from Lightroom to ON1 Photo RAW is easy. Follow along as we take you through all of the above steps in this video walkthrough.
Frequently Asked Questions About Lightroom Migration
Will this delete my Lightroom catalog?
No. Once the ON1 Photo RAW migration is complete, your Lightroom catalog will remain in Lightroom, where you can access them at any time.
Do my Lightroom edits transfer over?
No. Because Lightroom photos are saved in a nondestructive state, they will migrate without their developmental settings. Once they appear in your Photo RAW catalog, you can edit them using the same settings you would have used in Lightroom.
How long does the migration take?
It depends on the size of the catalog you’re migrating, and whether or not you opt for making rendered copies during transfer. Generally, it’s best to allow the Lightroom Migration Assistant to work overnight.
Will all of my folders get migrated? Where do they show up in ON1 Photo RAW?
All top-level folders in Lightroom will become top-level cataloged folders in ON1 Photo RAW.