

In portrait photography, post-processing is an essential step. Taking the unmodified image and bringing it to life with different sliders and adjustments is what we, as photographers, strive to do. Here are some tips and techniques that will help you transform your portraits in a fast and practical way.
ON1 Photo RAW 2020 gives you all the portrait editing tools you’ll ever need to tap into your creative side. Try it free for 30-days. It works on both Mac and Windows and will not watermark your photos during the trial period.
Ensuring Your Portraits Have Natural Color
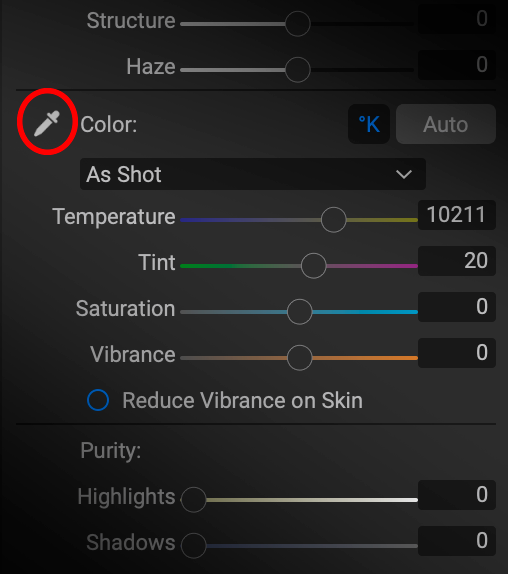
When you’re editing a portrait, and you decide to keep the color in-tact, it is essential to correct your color. Adjusting or correcting color can meat a lot of things. Color correction can involve removing color casts from an image or even cooling an image down when shot in a warmer temperature. One way that helps me to correct my colors quickly is to use the color dropper tool inside the Color Modifiers in my Tone & Color Pane. Just select the dropper icon to the left and drop it on an area that should be grey.
When shooting on an overcast day, clouds are perfect for this. Just drop the tool onto an area of grey in your sky, and it will remove any warm or cold color casts right away. You don’t need an overcast day to do this, you could easily find an object in a bright scene that should have been grey, and you can use that as your temperature guide.

If you’re a fan of using Effects to modify your Color, you can do this with the Color Enhancer filter, and then you could apply modifications selectively. Be careful, sometimes you may drop onto a lighter or darker color, and it might cause an unwanted warm or cold temperature change. If you’re a fan of using the slider, try pulling your Temperature slider all the way to the left or right. Gradually pull it back until you’ve reached your desired look.
Try Black & White to Showcase Texture
Sometimes portraits don’t need any help from the vibrancy of color to feel complete. In the absence of color, our eyes are are drawn in to appreciate the textures and details of facial features, hair, clothes, etc. In Photo RAW, there are a few ways you can convert your portraits to Black and White. The most basic approach would be to simply remove all of the Saturation in the Tone & Color Pane, but I prefer using Filters. Filters provide me with the ability to mask and blend adjustments. They also allow me to enable and disable changes quickly.

My favorite way to convert a portrait to BW is in the Effects Tab using the Black and White Filter. With the Black and White Filter, you can convert your image by using either Color Response or Channel Mixer. Using Color Response will allow you to modify the luminance of certain color tones by changing their sliders.
For example, if I had a lot of blues in a model’s clothes, I could lower the Blue slider to darken them and make them less prominent in the scene. With our example photo, there are red tones in his skin and on his bandana. To pull these tones out, we can modify the Red slider in the Black and White Filter.

The Channel Mixer Conversion will use the slider to choose a look that accentuates the color tones that are most interesting to you. So if you had a lot of greens in your colored image, you could move the slider to the hue of green, and it would make those colors brighter in the black and white. You could also use the actual Channel Mixer Filter, new to Photo RAW 2019. The Channel Mixer Filter is a bit more complicated than the Black and White Filter, but you can achieve BW using the presets in the More Menu. To finish off my BW portraits, I typically apply a Dynamic Contrast Filter so that I can incorporate more texture and detail. The Dynamic Contrast Filter is not always necessary, especially when you’re editing female portraits as they typically would rather have “softer” skin. The textures on this man’s face and facial hair, however, are perfect for a pop in detail. In the Dynamic Contrast Filter, I’m using the “Surreal” Preset Style, which will brighten the shadows and highlights a bit, pulling out some of those darker details in the portrait.

Dodging and Burning for Controlled Lighting
Dodging and burning is an excellent technique for brightening and darkening particular tones in your portraits. Just like landscapes, portraits sometimes need adjustments applied selectively. Darkening specific areas (a photo editing process called Burning) on your portrait can help tame highlights, force the viewer’s attention, and remove distractions. Lightening particular areas on your photograph (you’ve probably heard this referred to as Dodging) can help to draw attention to them, show darker details that weren’t present before, and make the subject pop out in a scene.

In this portrait, the highlights on the leaves around our model are very intense and distracting to the viewer. A quick way to fix this is to use a Local Adjustment to Burn these areas. A new Local Adjustment Layer is added automatically to your photograph whenever you first go into your Local Adjustments Tab. New Local Adjustment Layers are set to Darken by default, meaning the exposure is set to -1.
I like to use gradients and shapes to apply my Local Adjustments, even more-so in portrait editing. To access shapes and gradients, grab your Adjustable Gradient Tool by holding down Shift + K on your keyboard. In the top tool modifier bar, you can select different shapes and gradient presets.
One of my all-time favorite masks is the “Center” shape. This mask will apply the adjustment or Filter to the outside of the photo and protect everything inside of it. This shape is perfect for creating custom vignettes with a Local Adjustment Layer. What we can do here to Burn the highlights is to use a circular shape that protects our model’s face and removes exposure everywhere around it.

I also tend to use blending modes on the Dodge and Burn Layers. One blend mode that is great for darkening the exposure, even more, is the Multiply Blend Mode. Use it on your Burn Layer to remove even more highlights or mid-tones. You can always lower the opacity of the layer to look natural later. If you want to learn more about Blending Modes, check out this all-new Blending Modes Mini-Course.
Now that we’ve removed blown out highlights from our image, we can start to pull the subject out of the frame by Dodging. I added a new Local Adjustment Layer, and I selected the “Lighten” preset style. Now we can selectively apply this lightening layer to brighten areas on our photograph. I used my Adjustment Brush (K) rather than my Adjustable Gradient. I set my opacity and feathering both at 100 and used a moderate brush size to paint in light onto the model’s face. Because the Lighten adjustment tends to be quite strong on portraits, I lowered the opacity of the adjustment layer to around 60; this will ensure the layer isn’t too bright on her face.

Notice how her face is standing out against the highlights now? I haven’t even modified anything in the Tone & Color pane, and we already have a better-exposed image. Add a quick LUTs Filter for style, and your portrait is good to go!
Removing Blemishes with the Retouch Tool
Retouching a portrait is a great way to remove slight imperfections or blemishes that may feel unnatural in the scene. There are many times that a picture doesn’t need any retouching at all, and that’s fine, but if you’re looking to become a better portrait photographer, this is an essential step in portrait editing. An excellent tool for retouching is the Retouch Brush. The Retouch Brush lives in your left tool well or you can access it by hitting R on your keyboard. Photo retouching is a delicate process and should be done with care. Sloppy retouching is noticeable and looks unprofessional. If you have the time to give, give retouching the time it deserves, and you’ll be much happier with the results.

The Retouch Brush is going to detect differences in tonalities (where the blemishes are), and it’s going to fill it in with similar information to the surrounding area. I tend to keep my opacity at 100; this way, all of the imperfection is removed from the scene. When dealing with more substantial blemishes or imperfections, try using a larger brush size. If your blemish removal isn’t the way you want, try using the Perfect Eraser Tool. The Perfect Eraser is excellent for removing larger objects and even people from a scene, but it can work well on skin textures as well.
The Perfect Eraser is going to remove your imperfection and replace it with a content-aware fill that will mirror tonalites in the scene. I like to use the Perfect Eraser for removing stray hairs from faces or for removing large dust spots if they are distracting.

Cropping to Complete the Frame
Cropping may seem like a fundamental tip, but many people forget to crop their images. It’s an easy mistake to make. Not all portraits need cropping, but the ones that do will benefit immensely from it. Cropping is a great way to explore new framing and compositions. You can discover completely different images in one scene with cropping. You can access the Crop Tool by hitting C on your keyboard.
When cropping, try and use your rule of thirds guidelines to help you frame. By placing your subject or interesting objects in your scene on these intersections, your image is going to become more pleasant and cohesive. Don’t stray from rotating the crop or cropping in very tight, and you might find a look you enjoy.
Let’s take a look at this image, for example. If we were to remove the excess areas on the left and right side of the frame and make the image tighter, we could provide the viewer with a much more intimate, personal portrait, rather than one that feels a bit too far away.

Now let’s see that same image cropped into a very tight frame. The photo looks much different with a 4×5 vertical crop rather than the landscape orientation it had before.

We have now seen two different perspectives of the same shot just by using the Crop Tool. Let’s look at one more just to see the power of the crop. In this image, there is a significant amount of light on her face that we can capitalize on by utilizing a tighter frame. We can force the viewer to appreciate the lighting and textures in this space of the image by cropping. Instead of a vertical crop, let’s give this photo a cinematic feel by cropping it horizontally.

Notice how we’ve shifted the perspective. We’re less worried about where the scene is and more focused on what the scene has in it.
Practice these tips on your own photos with ON1 Photo RAW 2020. Have fun!
2 comments on “5 Tips to Improve Your Portrait Editing”
On February 15, 2020 at 2:51 pm fireray wrote:
Fantastic
On February 24, 2020 at 10:01 am Juan Cabana wrote:
Great tips, thank you!
Please review our our privacy policy for information about how we use the data we collect.