
If you’re one of the thousands of photographers still using Apple® Aperture®, you probably heard that it won’t run in versions of the Mac operating system after Mojave. Now, it’s time to migrate your photos out of this old app and get a replacement. For many photographers, ON1 Photo RAW is the ideal Aperture replacement. It has the complete file management and non-destructive raw processing that photographers need plus layers and effects that would typically need Adobe® Photoshop®.
Here are some step-by-step instructions to help you successfully migrate your Aperture library to ON1 Photo RAW and maintain your file organization structure, metadata, and edits. This process will require a lot of hard drive space to make the migration. For safety sake, we are going to duplicate every photo in your Aperture library. I suggest using an extra external hard drive for this migration process. Secondly, it’s important to understand that ON1 Photo RAW doesn’t need to catalog your photos. It merely browses or watches real files and folders on disk. That means your photos are not kept in a database or vault. You can navigate to them at any time with the Finder.
Step 1: Make Sure You Have Access to All your Aperture Photos
The first step is to make sure you have all your photos accessible on your computer. The photos need to be linked-up and not stored in the Aperture Vault. To accomplish this, use the Aperture command “Relocate Originals.” You can find this in the file menu. This will move any photos into a logical folder structure on your computer. You can choose how you want them organized in the Subfolder Format box. You can organize by date or project name. This moves the photos on your computer hard disk. It won’t take more space yet.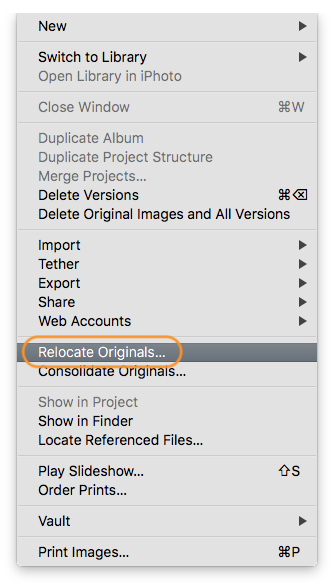

Step 2: Export your Keyword List
You can move your master keyword list from Aperture to ON1 Photo RAW quickly. (Starting with ON1 Photo RAW 2019.5 you can import a keyword hierarchy or nested keywords.) Open the Aperture Keywords panel and click on the Export button. Hold on to this exported File. A note on migrating nested keywords in photos, unfortunately, Aperture doesn’t write the keywords into the photo metadata hierarchically, so you may have some clean up to do later.
Step 3: Flags
Aperture will transfer color labels and star ratings, but unfortunately, it won’t export the flags. If you want them, you need to add them as keywords temporarily. To do this in Aperture, find all the photos with a flag. The easiest way to do this is in the search box in the upper right, select the Flagged option. Then select all the photos and add a keyword like “flagON.” We will map this over to the correct spot in Photo RAW later in this process.
Step 4: Export your Master Photos
This next step can take a lot of hard disk space. Attach a clean external hard disk if you have one for this process. Select ALL your photos, then Go to File > Export and select the Masters option. This will export copies of all your original photos and their metadata. In the Subfolder Format section, select Project Name or Folders by Date, however, you want your photos organized. In the Metadata section, make sure you have the Create IPTC4XMP Sidecar file selected. This will create standard .xmp sidecar files that contain all your metadata for each photo. ON1 Photo RAW can read these sidecar files and get the metadata for each photo.

Step 5: Get your Edited Versions
If you have been using Aperture for many years, you have probably edited and adjusted many of your photos. Remember that as a non-destructive editor, these adjustments are stored in the Aperture library, not in each photo. To keep your changes, you will need to export a rendered copy of the images you have edited. This step is optional, but you will likely want to do it. First, we want to find only the photos that you’ve adjusted. Create a new Smart Album in Aperture where the Adjustments option in on and set to “are applied.” This will find just the photos with adjustments. Select all of them (or at just the ones you care about) and go to File> Export and select the Versions option. Be sure to use the same Subfolder format that you used when you exported your Masters. Select the JPG format and finally In the Custom Name field add “Adjusted” so you can tell them apart from the Master that they will be stored with.

Okay the hard part is done! Now comes the moving to ON1 Photo RAW part. If you haven’t yet installed it and launch it.
Step 6: Import your keywords
Find the Keyword pane in Photo RAW, click on the gear in the header and select Import. Then point it towards the keyword list you exported from Aperture. This will import your keywords and their hierarchy (ON1 Photo RAW 2019.5 and above)
Step 7: Add a Cataloged Folder
From the File menu, select Add Cataloged Folder. Select the location you exported your Masters and Versions to, likely that external hard disk. Now in the Cataloged Folder section of the Folders pane, you will see the folders based on project or date. However you exported them. In the background Photo RAW is indexing those folders to extract the metadata from the sidecars and making your photos searchable and faster to browse. This can take a couple of hours or more depending on the number of photos you have.

Step 8: Fix your Flags
The last step, almost there. Now it’s time to fix those pesky flags. In the Filter pane, in the search field, look for the keyword you added for flagged photos, such as “flagON.” Be sure to check on the “Search Cataloged Folders” option. This will find all the photos with the “flagON” keyword. Select all of them and go to the Photo menu and select Like > Like to add the like flag to all of them. You can then remove the flagON keyword from the Keyword pane.

Congratulations! You have done it. You can browse your project folders in the Folders pane. ON1 Photo RAW has similar views to Aperture including the Grid, Filmstrip and Detail views. The photo information that lives in the Info tab in Aperture appears in Browse in the right column of panes: Info, Metadata, and Keywords. When you want to edit/adjust a photo, click on the Edit button. This takes you to Develop, which is similar to the Adjustments tab in Aperture, but is also the home to Effects, Portrait and the Local Adjustments.<ApertureViews, FileInfoCompare, ThumbCompare>
Need an Aperture Alternative? Look Here
May 6, 2019 • 24202 Views • Posted by Dan Harlacher

4 comments on “Need an Aperture Alternative? Look Here”
On May 7, 2019 at 8:48 pm Stein Tronstad wrote:
So in other words no adjustments will be retained and the number of files will triple. Looks like it will have to be Capture One then.
On May 10, 2019 at 10:49 pm Jerry Camarillo wrote:
Wow, here I am thinking I’m the only photographer left on earth that uses Aperture. Thanks for this, I will give it a try. Although the extra hard drive space concerns me. I use jpeg mini to reduce file sizes without losing quality. Which do you suggest ? I put all the images through Jpeg mini or straight through like you suggest ? Again, thank you so very much in realizing that theres closeted Aperture users.
On July 5, 2019 at 12:08 pm Lew Brown wrote:
Thanks for this guide, it was helpful! One thing that will make life easier is to remember to embed metadata into the files after converting them to referenced. Easy to do, just select all the images that are referenced and in Aperture choose “Write IPTC Metadata to Masters” from the Metadata menu. While not necessary for RAW files, it is necessary for others (jpegs, tiffs). Once I referenced the images and applied the metadata to the files, I could browse into any of them and the keywords and other IPTC were already picked up by OnOne. This was before I exported the masters.
On April 17, 2021 at 9:56 am Brian McCann wrote:
At Last a means of migrating from Aperture to ON1..thank you.
I have completed the instructions and it seems to have worked well.
Two questions.
-I realize the keyword list has been copied and moved over, but the keywords have not been attached to each image. Have I done something wrong?
– Is it now safe for me to delete all my Aperture images to free up hard drive space?
Please review our our privacy policy for information about how we use the data we collect.